Showing posts with label Nails. Show all posts

Tuesday, May 22, 2012

Nail polish summer trends.

I have not been very creative with my nails lately. Just never seem to find enough time to do different things. However, I still maintain them and make sure they have a cute color on. Lately I have been very into coral and nude colors. Mint and lilac colors are also very in for this season and the summer. I shall try them very soon, but for now I have a few examples of what I have been doing with my nails lately.
Essie "Cute as a button" and some gold glitter 'ombre' style from the bottom to the top.
To obtain this effect (which I found a bit hard) you must start from the bottom and brush it towards the top making sure the bottom has the most amount of glitter and the top the least.

Essie "Brooch the subject" and Martha Stewart glitter.

Essie "Cute as a button" plus a gold polish I got from Aldo.


Friday, December 16, 2011

Christmas & basic nails.

This week has been a very busy for me. Although stressful, a few things got accomplished and it feels amazing to know that. I had been planning to do a post about the best neutral colored nail polishes but never got to it, so I decided to combine that post with my new Christmas inspired nails that I just did last night.

I love neutral colors, and absolutely love them on nails because when they start chipping you can't notice and they are easier to paint. So I picked a few of my favorite colors to share with you.

My new favorite neutral: Essie's "Case Study"

A few of my favorite neutrals (from left to right):
OPI "Samoan Sand"
Essie "Brooch the Subject"
Essie "Playa del Platinum"
Essie "Case Study"

Essie has tons of neutral colors, from grayish to pink to beige. So if you are looking for some good nail polishes, try this brand.

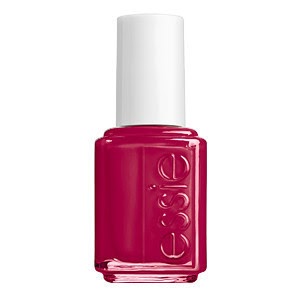
Here is my Christmas inspired nails. I thought about doing green and red but I have a Christmas party to go to this Saturday and still don't know what I was going to wear, so I figured the more basic the better. So I went with my new favorite red, which is more of a wintery red (not so bright) and on my accent nail I used red Martha Stewart glitter (After i finished my nails, I wished I had done the accent nail with green glitter, but I still love it).

Essie's "Size Matters" + Martha Stewart glitter


Tuesday, November 15, 2011

The Hunger Games nail polish.

I almost fainted when I came upon this link on the fansite for The Hunger Games. I am currently reading the 3rd book of the series and have already shared with you what I thought about the first two books. However, everyone knows I obsessed over nail polish, so when I found out that China Glaze is coming up with a "Hunger Games" inspired collection I had to share.

Here are the colors:


  • Primrose – inspired by Prime


  • Rebel – inspired by Gale


  • Catnip - inspired by Katniss


  • Coal-hearted - inspired by District 12


  • Joined at the Seam - inspired by The Seam


  • Fight to the Finish - inspired by the night sky the tributes look into


  • We Could Runaway - inspired by the forest Katniss and Gale hunt in


  • Baker’s Son - inspired by Peeta


  • Cina-mon - inspired by Cinna’s gold eyeliner


  • Fire in Flight - inspired by the Flaming Mockingjay


  • Heat of the Moment - inspired by the costumes Katniss and Peeta wear into the arena


  • Flaming Gems - inspired by Katniss’ interview dress


  • I cannot wait for these polishes to come out in 2012 :)


    Friday, November 4, 2011

    Size matters.

    Last week I painted my nails a neutral grey that I purchased a couple of weeks ago. French quarter for your thoughts, a fall 2011 OPI polish, is a light grey with a great consistency. So this week, I decided to use one of my newest polishes, Size matters from Essie's fall 2011 collection, and fell in love with it. I am a little picky with dark colors and find myself leaning towards light colors right now, but red is always a favorite when my nails are super short. Consequently I decided to try my new red. I am also picky with red nail polish. It either has to be super bright red, or a berry red but I have to try it on to be able to tell if I will like it or not. This ruby red with a hint of berry is the perfect winter red. It is a little bit darker than your regular reds but it is not on the brown scale. Also, I decided to take a picture of my nail polish collection because every week it is so hard to pick a color and I wanted to share with you guys the reason why. Oh, and because my box is full, so now I will have to find a new one to start filling it up.

    My nail polish collection.


    OPI "French quarter for your thoughts".


    Essie "Size matters".


    Friday, October 21, 2011

    Fall's new nail polishes.

    This week Beso came up with an article on this season's new nail polish trends and a few tips on how to take care of your nails and do them yourself. The article was so nice that I decided to share it with you.

    Here are some great polishes:

    Bright reds:


    Dark reds and pale pinks:


    Glitter and different colors:


    Some do it yourself manicure tips:


    Here are some of my favorite new fall polishes from Essie and OPI:


    Essie "Very Structued" and "Power Clutch".


    OPI "French Quarter for Your Thoughts"and Essie "Case Study".


    OPI "Road House Blues" and "Uh-Oh Roll Down the Window".

    Enjoy your weekend! :)


    Thursday, October 13, 2011

    I'm back!

    Let me begin by apologizing for being gone for so long! My life turned upside down for a couple of weeks, and I have not had any time to even think about posting. Now that everything is settled, I am super excited to be posting my thoughts again. I have so many things I want to share with you all, so stay tuned.

    Here are some nail polishes I have done for the past couple of weeks. The first one is a color I have been wanting to try by China Glaze. It's a light olive with gold sparkles. In person, it did not look as exciting as it did online, but I still love it for this fall. The second, by Essie, is a perfect nude pink. Love, love love. It is creamy and blends right with your skin color. The third is another China Glaze which reminds me of Essie's Merino Cool, which I am obsessed about. It is a grey-taupe with a hint of purple to it. I absolutely recommend all of these colors for this fall.

    China Glaze "Trendsetter".

    Essie "Topless and Barefoot".

    China Glaze "Below Deck".

    Friday, September 16, 2011

    Last week I finally received in the mail a few new polishes. When I first put eyes on the OPI fall 2011 collection, I immediately knew that I had to have "Road house blues" due to my obsession with Navy. So, as soon as I opened the package, I had to try it on and decided to use this new gold I got from Aldo on my accent nails and here is the end result (absolutely LOVE Road house blues!)


    Friday, September 9, 2011

    Shimmery pink.

    Yesterday we lost power and I was not able to use the computer for the entire morning and some of the afternoon, so I ended up not posting. Anyway, I took advantage of my free time to get my nails done and tried out a new version of the water marble nails. This time I dipped multiple nails in the water at once so that it saved more polish and time. Also, I used a shimmery gold glitter amongst some muted pinks. For the base coat, I used Essie "Innocent" and for the water mixture I used a gold from Forever 21, Essie "Innocent, Essie "Topless and Barefoot" and Essie "Neo Whimsical". Here is the result:

    Left hand.

    Right hand.
    The left hand came out better than the right hand but everything looked nice in the end and subtle which was my main goal upon starting this little project.


    Wednesday, August 31, 2011

    Muted marble.

    Let me start by saying that due to Irene, I was not able to post on Monday and Tuesday. Now that she is finally gone; although so many people are still suffering from her impact, some of us are finally able to go back to our everyday life. Because I was stranded at home, I had nothing better to do than my nails. Since I learned the technique of water marble, I have been wanting to use neutral muted colors to make a beautiful design. So, I gathered some of my favorite polishes and started the steps for water mark nails. Below are the polishes I used in order from left to right: Essie "Merino Cool", Essie "Playa del Platinum", Essie "Smokin' Hot" and Essie "Case Study" (which I used for all my nails as the base coat).

    Essie polishes.

    Left hand.

    Right hand.

    As you can see, for some strange reason - or my lack of technique - the left hand came out more stripy while the right hand had a pretty design. I did my ring fingers first, therefore you can see how the designs are simpler. However, I loved the color combination so much that I decided to do my thumbs as well. On those nails, I went all out and got much more polish on them making the designs more intricate. In this case, practice definitely makes it perfect!

    Wednesday, August 24, 2011

    Marble Nails.

    Here I am again with another nail post. I cannot help it but always have nail posts since I do them every week and am always trying to experiment with new things. This week I did the water marble nails. My dear friend Britney sent me a link with a step-by-step explanation on how to do them and I could not wait to try. I had previously purchased a color that I had been wanting for a while but could never find it in stores. I am very picky with blues and greens when it comes to nail polishes because I always feel like blues make me look like an alien; however, this polish, called "Turquoise & Caicos" by Essie, is the perfect light turquoise and has become one of my favorites.

    I followed the exact link Brit sent me and watched a few videos before starting it.
    Click here for Brit's link.
    Click here if you want to watch a video on how to do marble watermark nails.

    A mistake I realized I made too late was that I only used one drop of each polish. I noticed after watching some more movies that the end result looks better if you repeat the color a few times or you might not get some colors on your nail. Also, I wish I had made a better pattern, I was not too worried about what it would look like and did not want to mess up the polish so I only ran the stick through the water about two times. Next time I plan on mixing the colors perfectly so that when I dip my nail in a particular area, it will obtain all the colors.


    These are the colors I used in this order: a regular black from ELF, a white from L.A. Colors, Essie Turquoise and Caicos, Essie Lapis of Luxury and OPI Suzi skis in the pyrenees.

    I was a little too lazy to repeat the steps on all my nails so I decided to try on just one and see how I like it.

    My left hand.

    My right hand.

    As you can see the black was almost nonexistent. On my left hand, you can barely see the white, and on both hands, the blue is also very subtle. The patterns turned out very different which was due to me not making similar patterns on the water and also by not dipping the finger on the same spot. Regardless of these "accidents" I still loved the end result. It does not bother me that they look different because I think it gives a unique interesting look to each. They look great and I cannot wait to try them in all my fingers (although I do like the idea of just on one, otherwise I think it might be too much for my taste!). Next, I plan on trying this water marble technique again but with muted colors!!!


    Friday, August 19, 2011

    Neo Whimsical

    Last week, I purchased a few new nail polishes that I absolutely love! I invested on some pastel colors that I was missing amongst my collection. One example, is this light but creamy pink by Essie called "Neo Whimsical". This turned out to be the perfect easter pink. Although I love dark and fun colors, I also love basic clean looking pastels because they do not look as bad when chipped and they are basic while not interfering with whatever you want to wear. So, I painted my nails with two coats of "Neo Whimsical" and on my accent nail I tried this silver glitter by L.A. Colors which has tiny silver sparkles mixed with bigger glitter pieces called "Sparkly Diamonds". The result was absolutely perfect! Keep in mind that the lighting changed the pink a tiny bit, so my nails look just like the pictures, but a little more pink than the purplish pink it looks like. Click here to see a better picture of "Neo Whimsical".


    ** I would like to take a moment here to tank some of my followers and friends for all the support. I love receiving messages with tips and suggestions on what to post next. Thanks so much! :o)

    Monday, August 15, 2011

    Braziliant.

    I had been wanting to purchase Essie "Braziliant" for a while now. It seemed like a different orange and the fact that the name comes from Brazil also pushed me to have it. Luckily, after work I took a walk to a Walgreens and found it there (although it was the last bottle!!!). Once I got home, I decided to start by doing my toe nails. The result was a very bright, almost neon, orange with a bit of shimmer. Since I was not in the mood to have such a bright color on my finger nails, I decided to paint a beige color and add some orange glitter to still resemble my toes' color. Consequently, for my fingers, I did OPI's Samoan Sand, which is a perfect beige with a hint of pink that is exactly my skin tone, which I love! On the accent nail, I painted one hand of Braziliant and dipped the nail on this "Fire Opal" glitter by Martha Stewart.


    Essie - Braziliant on my toes.

    OPI Samoan Sand + Orange glitter.

    Thursday, August 4, 2011

    Follow the yellow brick road.

    This week I decided to do my nails yellow. I have been wanting to use this color for a while but was having trouble finding one that pleased me. When it comes to yellow nail polish, I feel the same exact way as the white. I have a difficult time finding one that suits me, and am not sure about the end result. Although I came to love white, I am still trying to find that love for the yellow. Usually, I prefer to do my toes in a bright or dark color. However, while walking through the Wal-Mart isles during a quick shopping trip for some things that were missing at home, I came across the perfect yellow for my toes. It's bright and pretty but it does not have that neon effect, which works perfectly for me. I purchased this Sally Hansen "Mellow Yellow" and used it on my toes. On the other hand, for my fingers, I picked this Revlon "Sunshine Sparkle" which is much more subtle and lighter color.


    This picture came out a little too bright, especially on my fingers, but I just wanted to be able to show the difference between the yellows.


    Here you can see what my finger nails really look like:


    Friday, July 29, 2011

    Barely there.

    All of that nude talk yesterday tempted me on doing nude nails. I had been wanting to try an accent nail on a nude nail for a while because I absolutely love light colored nail polishes. When I received my Martha Stewart glitter, I immediately picked my favorite one which is called Smoky Quartz. This glitter is light gold with hints of brown and camel which results in a less shine and a much more subtle color, unlike the found in jewelry. I paired it up with my favorite light Essie "Playa del Platinum", which is a light taupe with a hint of grey. The end result was magnificent, and the pictures do not do it justice.


    Ps. This time around, I applied only one coat of the polish to my accent nail then applied a clear coat and dipped my entire nail on the glitter container.


    Monday, July 25, 2011

    I've got the blues.


    Last week I finally received my Martha Stewart Crafts "Essential  Colors Glitter Set" in the mail. This amazing 24 colors pack of glitter works perfectly, reaching the effect I was looking for on my nails. Previously, I had used a different glitter (thicker) and I realized that, to be able to obtain the end result I was looking for, I needed to search and purchase a different one. Due to its vast variety of colors, it is very difficult to pick one to use at a time. This time, I decided to use a nail polish i purchased a while ago and have not had the opportunity to enjoy it yet. This light sky blue is perfect when looking for a change from the regular pink summer colors. Lapis of Luxury, by Essie, is light and subtle with a hint of purple. In order to reach the full potential of the polish, you must apply 3 coats. However, I do not like it when my polish chips quickly, so i decided to apply only 2 coats and it ended up looking a big faded but still adorable. Similar to my previous glitter post, Think Pink!, I used the same methods to apply the glitter on my accent nail, resulting in this beautiful combination of blues.


    Essie "Lapis of Luxury" and Martha Stewart "Lapis Lazuli"

    End Result: